Pages

Saturday, June 29, 2013

DIY: The Crackled Effect

The crackled nail effect

Ah, the famous crackled nail effect. 

Its quite the trend this year. I tried this at home using only nail polish and a crumpled plastic wrap. I dabbed the plastic wrap in black nail polish and directly pressed it onto my blue nails. The result is marvelous!

Teenage Enthusiasm by Dear Diary

Photoshop is wonderful

This was done in my Digital Design 1 class. It was one of our first projects and although I said I was going to start as soon as possible to do well- I ended up doing it in 2 hours. Still, I was happy with the outcome. This was all done with Photoshop and random Google images, so if you recognize one of your pictures in there I apologize and give you full credit.

I was obviously inspired by our generation. Hehe.

One Little Pig in a Brick House

The third piggy was the smartest of them all


One little piggy, two little piggy, three little piggy, four! Actually, there were only three in the tale of the Three Little Pigs. This idea came quickly to me, and only required an empty box and can of rice, and paint. You can use this for just about anything- that's what I like most about it.

Oh, and did I mention it would make a wonderful gift for just about anyone?


Hmm, wonder what I should use it as...

Any ideas? :)

Hello Kitty Cake Box

Hello Kitty loves pink

I'm not too sure what this is, to be honest with you. I made it while I was craving strawberry cheese cake (yum!) and decided to give it to a friend. It's not necessarily a box because you can't really open it. It's just hand-made decor I guess. However, you can stick to a small box, or on your wall. 

Maybe it was just a random impulse...

What do you think? :)

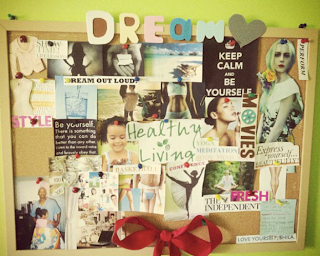
The Dream Board

A simple representation of all your current goals

A dream board is a board where you stick and pin pictures and texts of what you want to achieve next. It serves as a motivation to those who need to be reminded of their current doings. It's also a great way of decorating your room. 

Here's how to make it:

1- Buy a medium sized board at your local supply store (Walmart, Target, Staples) for 15$

2- Print out pictures of whatever you want: it can be pictures of your family to the latest fashion trends. Whatever it is, print it out and pin in to your board.

3- When your board is completely covered in pictures, pin it up in an empty space in your room. Voila!

You can change and update your pictures every time you achieve a goal. 

Good luck :)


Friday, June 28, 2013

Freedom Flutters

Butterflies, butterflies, we were meant to fly

I painted this after painting the tree on the wall that was parallel. It seems as though the butterflies were making their way out the window, or coming from outside and into my room. This is also a DIY which I decided to do instead of using stickers. I used a sharpie, paint, and different sizes of the butterfly model I had printed out.

Took me no longer than an hour to do :)

Winnie the Pooh & Friends

The colours really seem to compliment each other

“He’s the Winnie the Pooh, Winnie the Pooh, willy nilly silly old bear!” Who didn’t love this adorable bear as a kid? Oh, and piglet too! They’re so sweet and friendly, what’s not to love?

This painting was done over the length of two days and used up almost all my painting tubes. Luckily, the store was close enough!

I really love how the colors complement each other by making them all POP!